Keyboard Shortcuts and Keytips
Keyboard Shortcuts
There are many keyboard shortcuts built into Image-Pro
to help you perform common tasks quickly and easily.
General Workspace shortcuts
<F1> = Get Help
<F11> = Full Screen Display
<Alt> + <F10> = Show/Hide Keytips
<Ctrl> = <Tab> = Go to next tab (activates next image/view)
<Ctrl> + <Shift> + <Tab> = Go to previous tab (activates prior image/view)
<Ctrl> + <Y> or <Alt> +<Shift>+<Backspace> = Redo
<Ctrl> + <Z> or <Alt> +<Backspace> = Undo
<Ctrl> + <N> = New image dialog
<Ctrl> + <O> = Open file dialog
<Ctrl> + <P> = Print dialog
<Ctrl> + <S> = Save dialog
<Alt> + <Enter> = Show object or image properties
<Alt>+ <F4> = Close application
<Ctrl> + <F4> = Close active image/view
Image or ROI (region of interest) shortcuts
<Ctrl> + <X> or <Ctrl> + <Delete> = Cut (Cut the part of the image in the ROI onto the clipboard.)
<Ctrl> + <C> of <Ctrl> + <Insert> = Copy (Copy the part of the image in the ROI onto the clipboard.)
<Ctrl> + <V> or <Shift> + Insert> = Paste (Paste image from clipboard onto the active image. If there is no active image, a new image will be created.)
<Ctrl> + <Shift> + <V> = Paste New (Paste image from clipboard into a new image)
<Ctrl> + <Shift> + <C> = Crop (Crop the part of the image in the ROI into a new image.)
Graphical Object (ROI, Annotations, Measurements) Shortcuts
<Del> = Delete selected object
<Ctrl> + <A> = Select all objects in the active overlay
<Shift> + <Up>, <Down>, <Left>, or <Right>
arrow keys = Move the active handle of the selected object
Capture shortcuts<Ctrl> + Shift> + <U> = Increase exposure (exposure up) time using fixed units of 1 millisecond <Ctrl> + Shift> + <N> = Decrease exposure (exposure down) time using fixed units of 1 millisecond <Ctrl> + Shift> + <H> = Increase gain (gain up) in fixed units of one <Ctrl> + Shift> + <J> = Decrease gain (gain down) in fixed units of one <Ctrl> + Shift> + <K> = Snap, using current capture settings <Ctrl> + Shift> + <L> = Turn preview on or off |
|
Image-Prowith 3D Module only 3D View shortcutsQ - Switches between different transparency modes to display semitransparent objects (iso-surfaces, volume measurements). There are three rendering methods that support trade-offs between rendering speed and rendering quality. SORTED OBJECT BLEND - Uses multiplicative alpha blending, rendering all transparent objects after opaque ones. Sorts transparent objects by distances of bounding boxes from camera. (default, fastest) SORTED OBJECT TRIANGLES BLEND - Renders all the transparent triangles of the scene using alpha blending. All of the triangles of all transparent objects of the scene are collected and then sorted by object. SORTED TRIANGLES BLEND - Renders all the transparent triangles of the scene using alpha blending. All of the transparent triangles of all objects of the scene are collected, and then sorted by triangle position. (slowest, best quality) V - Toggles between selection and view modes. E – Saves the complete scene to an IV file. The IV file can be imported to other software (such as IVTuneViewer). X- Sets the camera view along the X axis. Use the Shift key to have the camera pointing along the axis in the opposite direction. Y- Sets the camera view along the Y axis. Use the Shift key to have the camera pointing along the axis in the opposite direction. Z- Sets the camera view along the Z axis. Use the Shift key to have the camera pointing along the axis in the opposite direction. |
Sequence Playback shortcuts
<Capture> = Select first frame
<End> = Select last frame
<Ctrl> + <Shift> + <A> or <Page Up> = Play sequence in reverse for 10 frames
<Ctrl> + <Shift> + <S> = Play sequence in reverse for 1 frame
<Ctrl> + <Shift> + <D> or <Escape> = Stop sequence playback
<Ctrl> + <Shift> + <F> = Play sequence forward for 1 frame
<Ctrl> + <Shift> + <G> or <Page Down> = Play sequence forward for 10 frames
<Ctrl> + <Shift> + <W> = Play whole sequence in reverse
<Ctrl> + <Shift> + <E> =
Play whole sequence forward
Zoom shortcuts
<Ctrl> + <+> = Zoom in one step
<Ctrl> + <-> = Zoom out one step
<Ctrl> + <0> = Zoom 100%
<Ctrl> + <1> = Scale Best Fit
<Ctrl> + <2> = Scale Width
<Ctrl> + <3> = Scale Height
Other Controls
Image-Pro contains some additional controls which may not be obvious to you. For example, in some cases, using the <Shift>, < Ctrl>, or <Alt> keys can modify the behavior of various tools. If you press the <Shift> key when selecting an elliptical ROI or annotation shape, Image-Pro will convert the ellipse to a circle. The same applies for converting rectangles to squares.
If you’re editing an existing line, you can increase the slope of line by 15 degrees by selecting the line and the <Shift> key. There is also a new feature available in Image-Pro to constrain the line to the slope of the original line, so that the line can be extended from either end. The cursor changes to make it obvious whether you’re extending the line, or snapping to a 15 degree multiple.
Command Line Controls
Image-Pro supports the following command line parameters.
Image-Pro.exe [/l lcid] [filename1 … filenamen]
/l lcid, allows to specify the language used by the product using its locale id such as “en” for English, “ja” for Japanese or “zh-Hans” for Simplified Chinese.
filename1…filenameN are image files to be loaded at startup.
Project path? expression, is used to call a macro during startup, for example “Image-Pro” “C:\Projects\Project1.ipp?Call Project1.StartupMacro”.
/u will check for possible updates and then close the application.
/log logfile, is used to create a log file used for troubleshooting startup issues.
Note: The parameters [filename1 … filenamen]
In addition to these command line options, pressing the keys <Shift>+<-Ctrl>+<-Z> during startup will reset the user settings and layout.
Keytips
Keytips allow you to navigate the Image-Pro GUI, opening ribbon bars and activating tools, using only your keyboard. Rather than clicking on application GUI elements with a mouse, you can simply type their keytips on a keyboard.
To use keytips:
Type
<Alt>+<F10>.
The top layer keytips are shown.
Type
<Alt> plus the letter of the tab you want to navigate to.
For example, if you want to show the 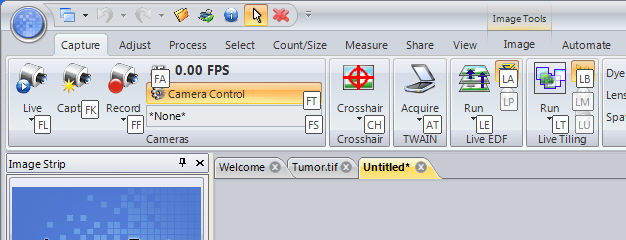
Type
the letters for the tool you want to execute or navigate to.
The tool is executed.
Note: If you want to then navigate to another tab, type <Esc> to show the keytips for the ribbon bars.